Dome ceiling light bulb replacement ifixit repair guide easy ways to replace an led recessed 13 steps how change a replacing lightbulbs and fixtures department of energy home 4 in fan wikihow remove cover no s top 11 modern lights install by tutor

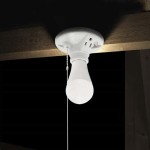
Dome Ceiling Light Bulb Replacement Ifixit Repair Guide

Easy Ways To Replace An Led Recessed Light Bulb 13 Steps

How To Change A Recessed Light Bulb

Replacing Lightbulbs And Fixtures Department Of Energy

How To Replace A Ceiling Light Home

4 Ways To Replace A Light Bulb In Ceiling Fan Wikihow

4 Ways To Replace A Light Bulb In Ceiling Fan Wikihow

How To Remove Ceiling Light Cover No S Top 11 Steps

Modern Ceiling Lights How To Install By Home Repair Tutor

4 Ways To Replace A Light Bulb In Ceiling Fan Wikihow

Dome Ceiling Light Bulb Replacement Ifixit Repair Guide

Home Electrical Repairs How To Replace A Ceiling Mounted Pull Chain Light Fixture

Why You Should Call An Electrician To Replace Your Light Bulb

How To Remove Light Bulb Bunnings Work Community

3 Easy Ways To Change A Ceiling Light Bulb Wikihow

Dome Ceiling Light Bulb Replacement Ifixit Repair Guide

Can I Replace My Incandescent Or Halogen Bulbs With Led Customer Service Q

Round Led Module Replace Ceiling Lamp Retrofit Lights Bulb White 12w 18w 24w 36w

How To Replace A Light Fixture With Ceiling Fan Projects By Peter
Dome ceiling light bulb replacement replace an led recessed how to change a replacing lightbulbs and fixtures home in fan remove cover no s modern lights install