Install Bathroom Ceiling Fan With Light

Install Bathroom Ceiling Fan With Light - A Beginner's Guide

Upgrading your bathroom with a ceiling fan with light is a functional and stylish addition that can significantly enhance comfort and aesthetics. Whether you're tackling this project as a DIY enthusiast or hiring a professional, here's a step-by-step guide to ensure a successful installation.

1. Choose the Right Fan

Selecting the appropriate ceiling fan is crucial for optimal performance. Consider factors such as room size, ceiling height, and desired features like lighting options and humidity resistance.

2. Gather Necessary Tools and Materials

Before starting the installation process, ensure you have all the necessary tools and materials, including a ceiling fan with light, mounting hardware, electrical wire, wire connectors, a screwdriver, a drill, and safety glasses.

3. Prepare the Electrical Wiring

Begin by identifying the location of the ceiling joist where you intend to install the ceiling fan. Cut a hole in the ceiling drywall using a drywall saw to access the joist and electrical wiring.

4. Install the Mounting Bracket

Attach the mounting bracket to the ceiling joist using the provided screws. Ensure the bracket is securely fastened and level.

5. Connect the Electrical Wiring

Connect the electrical wires from the ceiling fan to the corresponding wires in the junction box using wire connectors. Follow the color-coding guidelines (black to black, white to white, and green or bare copper to ground).

6. Hang the Ceiling Fan

Carefully lift the ceiling fan and align it with the mounting bracket. Secure the fan to the bracket using the provided screws.

7. Install the Fan Blades

Attach the fan blades to the motor housing, ensuring they are properly aligned and tightened.

8. Install the Light Fixture

Assemble and install the light fixture according to the manufacturer's instructions. Connect the light fixture wires to the corresponding wires in the junction box.

9. Test the Installation

Turn on the power supply and test the functionality of the ceiling fan and light fixture. Verify that the fan operates smoothly and the light turns on and off properly.

10. Finish the Installation

Once everything is working correctly, carefully tuck the excess electrical wires into the junction box and secure the cover. Replace the cover plate on the ceiling to conceal the junction box.


Install A New Bathroom Vent Fan Light

Install A New Bathroom Vent Fan Light The San Fernando Valley Sun

How To Install A Bathroom Fan Step

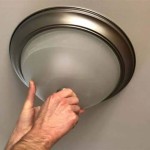
How To Install A Bathroom Fan Step By Guide Bob Vila

Bathroom Fan With Bluetooth Speakers

How To Install A Bathroom Fan With Bluetooth Speakers Fixthisbuildthat

Exhaust Fan During A Bathroom Remodel

Installing An Exhaust Fan During A Bathroom Remodel Greenbuildingadvisor

Installation Bathroom Exhaust Fan

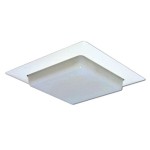
Hampton Bay 160 Cfm Ceiling Mount Room Side Installation Bathroom Exhaust Fan With Led Lighting And Night Light Lds Bf3001 The Home Depot

Should I Install A Bathroom Heater Fan

Should I Install A Bathroom Heater Fan Light Combo

Bathroom Exhaust Fan Guide

Bathroom Exhaust Fan Guide

Hunter Huntley Decorative Oil Rubbed

Hunter Huntley Decorative Oil Rubbed Broe 80 Cfm Ceiling Installation Bathroom Exhaust Fan With Light And Led Bulbs Included 80215 The Home Depot

How To Install A Bathroom Exhaust Fan

How To Install A Bathroom Exhaust Fan

Bathroom Exhaust Fan Ultra Quiet 1 0

Bathroom Exhaust Fan Ultra Quiet 1 0 Sones Ceiling Vent With 3 Adjustable Colors Lights 110 Cfm Bath Ventilation Light Combo Fits For Home Office Hotel 105 Sq Ft Com


Leave a Reply

Your email address will not be published. Required fields are marked *

This site uses Akismet to reduce spam. Learn how your comment data is processed.