How To Wire A Ceiling Fan With Light Single Switch

How to Wire a Ceiling Fan with Light Single Switch: A Comprehensive Guide

Installing a ceiling fan with light can be a daunting task, but it doesn't have to be. With the right tools and a little patience, you can easily add this stylish and functional fixture to your home.

Gather Your Materials

Before you begin, make sure you have all the necessary materials:

  • Ceiling fan with light kit
  • Electrical box
  • Ceiling fan mounting bracket
  • Electrical wire (14-gauge or 12-gauge)
  • Wire connectors
  • Screwdriver
  • Drill
  • Ladder

Safety First

Before starting any electrical work, it's crucial to ensure your safety:

  • Turn off the power at the main breaker.
  • Use a non-contact voltage tester to verify that the power is off.
  • Wear safety glasses and gloves.

Install the Electrical Box

If your ceiling already has an electrical box, you can skip this step. Otherwise, follow these steps:

  • Locate the desired location for the ceiling fan and mark it on the ceiling.
  • Cut a hole in the drywall using a drywall saw.
  • Install the electrical box into the hole and secure it with screws.

Mount the Ceiling Fan Bracket

Next, mount the ceiling fan bracket to the electrical box:

  • Attach the mounting bracket to the electrical box using the provided screws.
  • Secure the bracket firmly in place.

Wire the Ceiling Fan

Now it's time to wire the ceiling fan:

  • Connect the black wire from the ceiling fan to the black wire from the electrical box using a wire connector.
  • Connect the white wire from the ceiling fan to the white wire from the electrical box using a wire connector.
  • Connect the ground wire from the ceiling fan to the ground wire from the electrical box using a wire connector.

Wire the Light Kit

If your ceiling fan includes a light kit, wire it as follows:

  • Connect the black wire from the light kit to the black wire on the fan.
  • Connect the white wire from the light kit to the white wire on the fan.

Install the Ceiling Fan

Once the wiring is complete, you can install the ceiling fan:

  • Lift the ceiling fan onto the mounting bracket and secure it with the provided screws.
  • Tighten the screws securely.

Electrical Connections

Connect the wires from the ceiling fan and light kit to the wires on the single switch:

  • Connect the black wire from the fan and light to the black wire on the switch.
  • Connect the white wire from the fan and light to the white wire on the switch.
  • Connect the ground wire from the fan and light to the ground wire on the switch.

Install the Switch Plate

Finally, install the switch plate over the switch to complete the electrical connections.

Test the Installation

Turn on the power at the main breaker and test the ceiling fan and light:

  • Turn on the single switch to activate the fan and light.
  • Check that the fan is spinning smoothly and the light is working properly.

Congratulations!

You have now successfully wired and installed your ceiling fan with light single switch. Enjoy the added comfort and style in your home.


Wiring A Ceiling Fan And Light With

Wiring A Ceiling Fan And Light With Diagrams Ptr

Ceiling Fan Wiring Diagram Single Switch

Ceiling Fan Wiring Diagram Single Switch

Wire A Ceiling Fan To Light Switch

How To Wire A Ceiling Fan Light Switch Quora

How To Wire A Ceiling Fan Control

How To Wire A Ceiling Fan Control Using Dimmer Switch

Ceiling Fan One Switch Temecula Handyman

Ceiling Fan One Switch Temecula Handyman

How To Wire A Ceiling Fan Control

How To Wire A Ceiling Fan Control Using Dimmer Switch

Replacing A Ceiling Fan Light With

Replacing A Ceiling Fan Light With Regular Fixture Jlc

How To Wire A Ceiling Fan For Separate

How To Wire A Ceiling Fan For Separate Control Fo The And Light
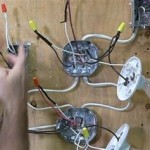
Replacing A Ceiling Fan Light With

Replacing A Ceiling Fan Light With Regular Fixture Jlc

How To Wire A Ceiling Fan Control

How To Wire A Ceiling Fan Control Using Dimmer Switch

Leave a Reply

Your email address will not be published. Required fields are marked *

This site uses Akismet to reduce spam. Learn how your comment data is processed.