Ceiling fan pull chain switch replacement how to replace a on easy easily repair or your 4 ways wikihow light home tutor broken step by instructions ifixit guide in pulls new with fix problem and garden life

Ceiling Fan Pull Chain Switch Replacement How To Replace A On Easy

How To Easily Repair Or Replace Your Ceiling Fan Chain

Ceiling Fan Pull Chain Switch Replacement How To Replace A On Easy

4 Ways To Replace A Ceiling Fan Pull Chain Switch Wikihow

Ceiling Fan Light Repair Home Tutor

4 Ways To Replace A Ceiling Fan Pull Chain Switch Wikihow

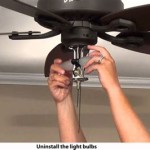
How To Replace A Broken Ceiling Fan Light Pull Chain Step By Instructions

Ceiling Fan Pull Chain Switch Replacement Ifixit Repair Guide

How To Repair Pull Chain Light Switch In Ceiling Fan

4 Ways To Replace A Ceiling Fan Pull Chain Switch Pulls

New Ceiling Fan Switch With Fix Pull Chain Problem Home And Garden Life

Replacing A Broken Pull Chain Switch On Ceiling Fan

How To Fix A Ceiling Fan Pull Switch With Light Pulls

Ceiling Fan Switch Zing Ear Ze 109 Two Wire Light With Pull Cords For Fans Lamps And Wall Lights Chain Control Replacement On Off 2 Pcs Nickel

Wiring A Ceiling Fan And Light With Diagrams Ptr

Ceiling Fan Light Switch Zing Ear Pull Chain Ze 109 On Off Sd With Compatible Fans Lamps And Wall Lights Broe Com

The Chain Is Stuck On My Ceiling Fan Light Ehow

Carro Troyes 48 In Color Changing Integrated Led Indoor Black 5 Sd Dc Ceiling Fan With Light Kit And Pull Chain Hcfp483q5 L11 Bg 1 Fma The Home Depot

Ceiling Fan Pull Chain Switch Replacement Ifixit Repair Guide
Ceiling fan pull chain switch replace your a light repair home how to broken in new with fix
Related Posts