How To Replace A Light Bulb On Ceiling Fan

How To Replace A Light Bulb On Ceiling Fan: Essential Aspects

Maintaining a functional ceiling fan is important for optimal air circulation, lighting, and ambiance in your home. Replacing a light bulb in a ceiling fan may seem like a daunting task, but with the right tools, safety precautions, and knowledge, it can be easily accomplished. This article will provide you with a comprehensive guide on the essential aspects of changing a light bulb in a ceiling fan, ensuring a safe and successful replacement.

To begin with, it is important to gather the necessary tools, including a new light bulb, a ladder, and a screwdriver. Safety should be your top priority, so ensure that the fan is turned off and the circuit breaker is switched off before starting the replacement process. Read the manufacturer's instructions carefully to determine the correct wattage and type of replacement bulb.

The next step involves accessing the light fixture on the ceiling fan. Depending on the fan's design, the light fixture may be accessed by removing a protective cover or shade. In some cases, you may need to remove screws or bolts to detach the fixture. Handle the fixture with care to avoid damaging it or the fan's electrical components.

Once you have access to the light fixture, carefully remove the burnt-out light bulb. Depending on the fixture's design, you may need to unscrew the bulb or gently pull it out of its socket. Be mindful of any sharp edges or broken glass while removing the old bulb.

Inserting the new light bulb requires precision and attention to detail. Align the bulb's base with the corresponding socket in the fixture and carefully screw it in until it is secure. Do not overtighten the bulb, as this can damage the socket or the bulb itself.

After replacing the light bulb, reassemble the light fixture and secure it back onto the ceiling fan. Ensure that all screws or bolts are tightened firmly to prevent the fixture from becoming loose or falling off.

Finally, turn the circuit breaker back on and switch on the fan to test the new light bulb. If the bulb lights up without flickering or buzzing, then you have successfully replaced it. Now you can enjoy the improved illumination and functionality of your ceiling fan.

Changing a light bulb in a ceiling fan is a relatively straightforward task that can be accomplished by following these essential steps. By understanding the parts of the fan, taking safety precautions, and carefully replacing the bulb, you can ensure that your ceiling fan continues to provide optimal lighting and air circulation in your home.


Replace A Light Bulb In Ceiling Fan

4 Ways To Replace A Light Bulb In Ceiling Fan Wikihow

Replace A Light Bulb In Ceiling Fan

4 Ways To Replace A Light Bulb In Ceiling Fan Wikihow

Replace A Light Bulb In Ceiling Fan

4 Ways To Replace A Light Bulb In Ceiling Fan Wikihow

How To Replace A Ceiling Fan Light Kit

How To Replace A Ceiling Fan Light Kit Smafan Com

How Do I Change This Lightbulb

How Do I Change This Lightbulb Bunnings Work Community

Replace A Light Bulb In Ceiling Fan

4 Ways To Replace A Light Bulb In Ceiling Fan Wikihow

Replace A Ceiling Fan Light Socket

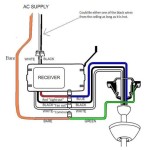
How To Replace A Ceiling Fan Light Socket Doityourself Com

Replace A Light Bulb In Ceiling Fan

4 Ways To Replace A Light Bulb In Ceiling Fan Wikihow

Light Bulb On This Ceiling Fan

How To Change The Light Bulb On This Ceiling Fan R Howto

Light Bulb For Your Ceiling Fan

How To Choose A Light Bulb For Your Ceiling Fan


Leave a Reply

Your email address will not be published. Required fields are marked *

This site uses Akismet to reduce spam. Learn how your comment data is processed.