How To Paint Ceiling Around Recessed Lighting

How to Paint Ceiling Around Recessed Lighting

Recessed lighting is a popular choice for home lighting, providing a clean and modern look. However, painting around recessed lighting can be a bit tricky, as you need to be careful not to get paint on the light fixtures. With a little care and attention to detail, you can easily paint the ceiling around recessed lighting in a professional and attractive manner.

Gather the Necessary Supplies

Before you start painting, ensure you have all the necessary supplies on hand. This includes:

  • Paint (in the color of your choice)
  • Paint roller and tray
  • Paintbrush (for cutting in around the recessed lights)
  • Painter's tape (optional)
  • Drop cloth (to protect your floor from paint drips)

Prepare the Area

Once you have gathered your supplies, prepare the area by removing any furniture or objects from the room. If you cannot move furniture, cover it with a drop cloth to protect it from paint. Next, turn off the power to the recessed lighting and remove the lightbulbs.

Mask Off the Recessed Lights (Optional)

To prevent paint from getting on the recessed lights, you can mask them off with painter's tape. Cut the tape into small pieces and apply it around the edge of each recessed light. Press the tape down firmly to ensure a good seal.

Cut in Around the Recessed Lights

Start by cutting in around the recessed lights with a paintbrush. This will help to create a clean and even edge. Be careful not to get paint on the recessed lights themselves.

Roll the Paint

Once you have finished cutting in around the recessed lights, you can start rolling the paint onto the ceiling. Use a paint roller to apply the paint in long, even strokes. Be sure to overlap each stroke by about 50% to ensure even coverage.

Apply a Second Coat

Once the first coat of paint has dried, you can apply a second coat. This will help to ensure that the coverage is even and complete.

Remove the Painter's Tape (if used)

Once the second coat of paint has dried, you can remove the painter's tape (if you used it). Be careful not to damage the paint when removing the tape.

Reinstall the Lightbulbs

Once the paint has completely dried, you can reinstall the lightbulbs in the recessed lights. Turn on the power to the lights, and you are finished!

With a little care and attention to detail, you can easily paint the ceiling around recessed lighting in a professional and attractive manner.


Spray Paint Recessed Light Trim

Easiest Way To Spray Paint Recessed Light Trim In 5 Mins

Spray Paint Recessed Light Trim

Easiest Way To Spray Paint Recessed Light Trim In 5 Mins

Spray Paint Recessed Light Trim

Easiest Way To Spray Paint Recessed Light Trim In 5 Mins

How To Paint Around Can Lights Hometalk

How To Paint Around Can Lights Hometalk

Spray Paint Recessed Light Trim

Easiest Way To Spray Paint Recessed Light Trim In 5 Mins

How To Paint A Textured Ceiling And Get

How To Paint A Textured Ceiling And Get Perfect Results

How To Paint A Textured Ceiling And Get

How To Paint A Textured Ceiling And Get Perfect Results

Brass Light Fixtures Using Spray Paint

Updating Even More Brass Light Fixtures Using Spray Paint Tempting Thyme

Paint Before Or After Electrical

Paint Before Or After Electrical Renos 4 Pros Joes
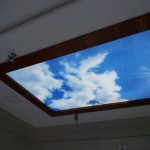
Recessed Lighting Guide The

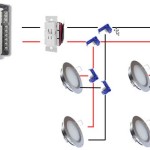
Recessed Lighting Guide The Home Depot


Leave a Reply

Your email address will not be published. Required fields are marked *

This site uses Akismet to reduce spam. Learn how your comment data is processed.