How To Install A Ceiling Fan With 3 Way Switch

How to Install a Ceiling Fan with a 3-Way Switch

Installing a ceiling fan with a 3-way switch requires careful planning and execution. Understanding the essential aspects of the process, such as wiring and switch configurations, is crucial for a successful installation. This guide will provide a comprehensive overview of the key steps involved, ensuring a safe and functional installation.

Before proceeding with the installation, it's essential to gather the necessary tools and materials, including the ceiling fan, 3-way switch, electrical wire, wire nuts, and a screwdriver. Additionally, ensuring that the electrical power to the area where the fan will be installed is turned off at the circuit breaker panel is paramount for safety.

The first step is to install the ceiling fan mounting bracket. Locate the electrical box in the ceiling and secure the mounting bracket to it using the provided screws. Ensure that the mounting bracket is level and securely fastened.

Next, connect the electrical wires from the ceiling fan to the wires in the electrical box. Match the black wire from the fan to the black wire in the box, the white wire to the white wire, and the green or bare copper wire to the ground wire. Secure the connections using wire nuts and tuck the wires neatly into the electrical box.

Now, it's time to install the 3-way switch. Remove the existing light switch and connect the wires from the switch to the wires in the electrical box. The black wire from the switch should be connected to the black wire from the fan, the red wire to the red wire, and the white wire to the white wire. Again, secure the connections with wire nuts and tuck the wires into the box.

Once the wiring is complete, mount the 3-way switch to the electrical box and turn on the power at the circuit breaker panel. Test the fan by flipping the switch. The fan should turn on and off as expected.

Finally, install the ceiling fan blades, light kit (if applicable), and any decorative elements. Ensure that all screws and bolts are securely tightened, and the fan is level and balanced.

By following these steps carefully, you can successfully install a ceiling fan with a 3-way switch, enhancing the comfort and functionality of your space.


Wiring A Ceiling Fan And Light With

Wiring A Ceiling Fan And Light With Diagrams Ptr

Three Way Switch For A Ceiling Fan

Charleston Home Inspector Explains How To Wire A Three Way Switch For Ceiling Fan Blue Palmetto Inspection

Ceiling Fan Light 3 Way Wiring Problem

Ceiling Fan Light 3 Way Wiring Problem Diy Home Improvement Forum

Three Way Switch For A Ceiling Fan

Charleston Home Inspector Explains How To Wire A Three Way Switch For Ceiling Fan Blue Palmetto Inspection

Three Way Switch For A Ceiling Fan

Charleston Home Inspector Explains How To Wire A Three Way Switch For Ceiling Fan Blue Palmetto Inspection

Installing Ceiling Fan Doityourself

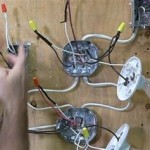
Installing Ceiling Fan Doityourself Com Community Forums

Wiring A Ceiling Fan And Light With

Wiring A Ceiling Fan And Light With Diagrams Ptr

Ceiling Fans With 2 3 Way Switches

Wiring 2 Ceiling Fans With 3 Way Switches Diy Home Improvement Forum

How To Wire A Ceiling Fan Control

How To Wire A Ceiling Fan Control Using Dimmer Switch

Wire A Ceiling Fan

Wire A Ceiling Fan


Leave a Reply

Your email address will not be published. Required fields are marked *

This site uses Akismet to reduce spam. Learn how your comment data is processed.