How To Change Ceiling Pot Light Bulb

How To Change Ceiling Pot Light Bulb

Changing a ceiling pot light bulb may seem like a daunting task, but it is actually quite simple. By following a few simple steps, you can easily replace a burnt-out bulb and restore light to your room. In this article, we will discuss the essential aspects of changing a ceiling pot light bulb, including safety precautions, tools required, and step-by-step instructions.

Before you begin, it is important to understand the different parts of a ceiling pot light. The pot light itself is the recessed housing that holds the bulb. The trim is the decorative ring that surrounds the pot light. The bulb is the light source that emits light. Once you have identified these parts, you can begin changing the bulb.

Safety Precautions

Before you start working on any electrical fixture, it is important to take some safety precautions. First, make sure that the power to the light fixture is turned off at the circuit breaker or fuse box. This will prevent you from getting shocked. Second, wear safety glasses to protect your eyes from any debris that may fall from the light fixture. Finally, be sure to use a sturdy ladder or step stool to reach the light fixture.

Tools Required

To change a ceiling pot light bulb, you will need the following tools:

  • A new light bulb
  • A screwdriver
  • A pair of pliers
  • A ladder or step stool

Step-by-Step Instructions

Now that you have gathered your tools and taken the necessary safety precautions, you can begin changing the bulb. Follow these steps:

  1. Turn off the power to the light fixture at the circuit breaker or fuse box.
  2. Use a screwdriver to remove the screws that hold the trim in place.
  3. Carefully pull the trim away from the pot light.
  4. Use a pair of pliers to grip the old bulb and turn it counterclockwise to remove it.
  5. Insert the new bulb into the socket and turn it clockwise to tighten it.
  6. Replace the trim and tighten the screws.
  7. Turn on the power to the light fixture at the circuit breaker or fuse box.

Your ceiling pot light should now be working properly. If you have any questions or concerns, please consult with a qualified electrician.


Replace An Led Recessed Light Bulb

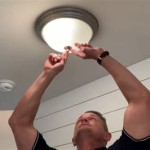
Easy Ways To Replace An Led Recessed Light Bulb 13 Steps

How To Change A Recessed Light Bulb

How To Change A Recessed Light Bulb

How To Remove Recessed Light Cover

How To Remove Recessed Light Cover Without Any Damage Brightest Lumen

How To Change A Recessed Light Bulb

How To Change A Recessed Light Bulb

Change A Recessed Or Canned Light Bulb

How To Change A Recessed Or Canned Light Bulb

How To Change Recessed Light Bulbs A

How To Change Recessed Light Bulbs A Step By Guide

Replace Indoor Recessed Lighting Bulb

How To Replace Indoor Recessed Lighting Bulb Hunker

Bulb On This Recessed Light

How Do I Change The Bulb On This Recessed Light R Howto

Recessed Lighting How To Change The

Recessed Lighting How To Change The Bulb Apartment Therapy

Light Bulb For This Recessed

How Do I Change The Light Bulb For This Recessed R Lighting

Leave a Reply

Your email address will not be published. Required fields are marked *

This site uses Akismet to reduce spam. Learn how your comment data is processed.