How to replace a ceiling fan with pendant light replacing regular fixture jlc 4 ways bulb in wikihow projects by peter can you add rings world the local business directory for small and large businesses step safely install your home white electric electricians north 5 tips dig this design

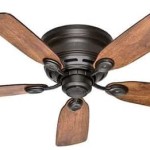
How To Replace A Ceiling Fan With Pendant Light

Replacing A Ceiling Fan Light With Regular Fixture Jlc

How To Replace A Ceiling Fan With Pendant Light

4 Ways To Replace A Light Bulb In Ceiling Fan Wikihow
How To Replace A Light Fixture With Ceiling Fan Projects By Peter

Can You Add A Light Fixture To Ceiling Fan Rings World The Local Business Directory For Small And Large Businesses

How To Replace A Ceiling Fan With Light Step By

How To Replace A Light Fixture With Ceiling Fan Projects By Peter

How To Safely Install A Ceiling Fan In Your Home White Electric Electricians North
How To Replace A Light Fixture With Ceiling Fan Projects By Peter

5 Tips For Replacing A Light Fixture With Ceiling Fan Dig This Design

Ceiling Fan Light Fixture Replacement Ifixit Repair Guide

How To Install A Ceiling Fan With Pictures Wikihow

Windmill Light Fixture Farmhouse Ceiling Flush Mount Fixtures Fan With

How To Fix A Ceiling Fan Light That S Not Working 5 Steps

How To Install A Ceiling Fan True Value

How To Install A Light Kit For Ceiling Fan New Year Room Part 2 Makeover Fixtures

4 Ways To Replace A Light Bulb In Ceiling Fan Wikihow

36 Rustic Downrod Mount Ceiling Fan With Lighting And Remote Control Parrotuncle

Which Way Should Ceiling Fan Blades Spin In Summer Winter
Replace a ceiling fan with pendant light replacing bulb in fixture to how safely install
Related Posts