Bathroom Ceiling Light Diy

Bathroom Ceiling Light DIY: A Comprehensive Guide for a Brighter Bathroom

Transform your bathroom's illumination with a bathroom ceiling light DIY project. Follow this detailed guide to create a brighter, more functional bathroom while saving money and adding a personal touch. Whether you're a seasoned DIYer or just starting out, we'll guide you through each step, covering essential aspects from choosing the right light fixture to ensuring proper electrical connections.

Planning Your Project

1. Determine the Lighting Needs: Consider the size, shape, and functionality of your bathroom. Measure the ceiling height and area to determine the appropriate light output and fixture size.

2. Choose the Right Fixture: Select a ceiling light fixture that complements your bathroom's style and meets the required light output. Consider fixtures with adjustable brightness and multiple light sources for flexibility.

Materials and Tools Required

  1. Ceiling light fixture
  2. Electrical wires and connectors
  3. Drill and drill bits
  4. Screwdriver set
  5. Voltage tester

Step-by-Step Instructions

1. Safety First: Turn off the electricity to the bathroom at the circuit breaker. Use a voltage tester to ensure no live wires before proceeding.

2. Prepare the Ceiling: Remove the existing light fixture and ceiling plate. Drill holes for the new fixture's mounting screws, ensuring they align with the provided mounting bracket.

3. Install the Mounting Bracket: Attach the mounting bracket to the ceiling using the included screws. It should be securely fastened and level.

4. Wire the Fixture: Connect the electrical wires to the fixture's terminals according to the manufacturer's instructions. Use wire connectors to secure the connections.

5. Mount the Fixture: Lift the fixture onto the mounting bracket and align the screws. Tighten the screws securely, ensuring the fixture is flush against the ceiling.

6. Restore Power: Turn on the electricity at the circuit breaker and test the light fixture. Adjust the brightness or light sources as needed.

Tips for a Successful Installation

  • Use appropriate-sized drill bits and screws for a secure installation.
  • Double-check all electrical connections to prevent short circuits.
  • Consider hiring a qualified electrician for complex installations or if you're not comfortable working with electricity.
  • Clean the fixture regularly to maintain its brightness and aesthetics.

Conclusion

With a little planning and effort, you can successfully DIY a bathroom ceiling light installation. By following these comprehensive instructions and taking necessary precautions, you'll not only brighten up your bathroom but also enhance its functionality and style. Remember, safety is paramount, so always consult a professional if you have any doubts or encounter unexpected issues.


Diy Boho Flush Mount Ceiling Light

Diy Boho Flush Mount Ceiling Light Story Jenna Sue Design

Bathroom Light Fixture Makeover

Bathroom Light Fixture Makeover Sawdust Sisters

Diy Boho Flush Mount Ceiling Light

Diy Boho Flush Mount Ceiling Light Story Jenna Sue Design

Diy Bathroom Light Fixture From Ceiling

How To Build A Diy Bathroom Light Fixture From Ceiling Thediyplan

16 Diy Light Fixture Ideas You Can Make

16 Diy Light Fixture Ideas You Can Make For Bob Vila

Diy Bathroom Light Fixture From Ceiling

How To Build A Diy Bathroom Light Fixture From Ceiling Thediyplan

Bohemian Bathroom Lighting Inspiration

Bohemian Bathroom Lighting Inspiration And Ping Guide Hunker

Bathroom Lights For Our Master

Help Me Choose New Bathroom Lights For Our Master
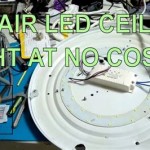
Light Your Bathroom D I Y Advice

How To Light Your Bathroom D I Y Advice Bunnings

Bathroom Fan Light

Appaly You Can T Buy A Good Looking Bathroom Fan Light R Diy


Leave a Reply

Your email address will not be published. Required fields are marked *

This site uses Akismet to reduce spam. Learn how your comment data is processed.